I gave a talk at ElixirConf 2015 on combining the Phoenix web framework with the Elm programming language. This is the tutorial that was referred to in that talk.
The tutorial walks through the creation of a very basic seat saving application, like one you'd use when booking a flight for example. The application will do just enough to demonstrate the mechanisms for getting the two technologies talking to each other.
There is an accompanying repo for this tutorial. Each of the numbered steps has an associated commit so that you can just look at the diffs if you'd rather not read through the whole thing.
Getting Elm and Phoenix to play together
Now that we have a basic Phoenix application in place, let's add a basic Elm application into the mix. There are several ways that we can combine Phoenix with Elm:
Keep the two applications completely separate. This is probably the easiest way to go.
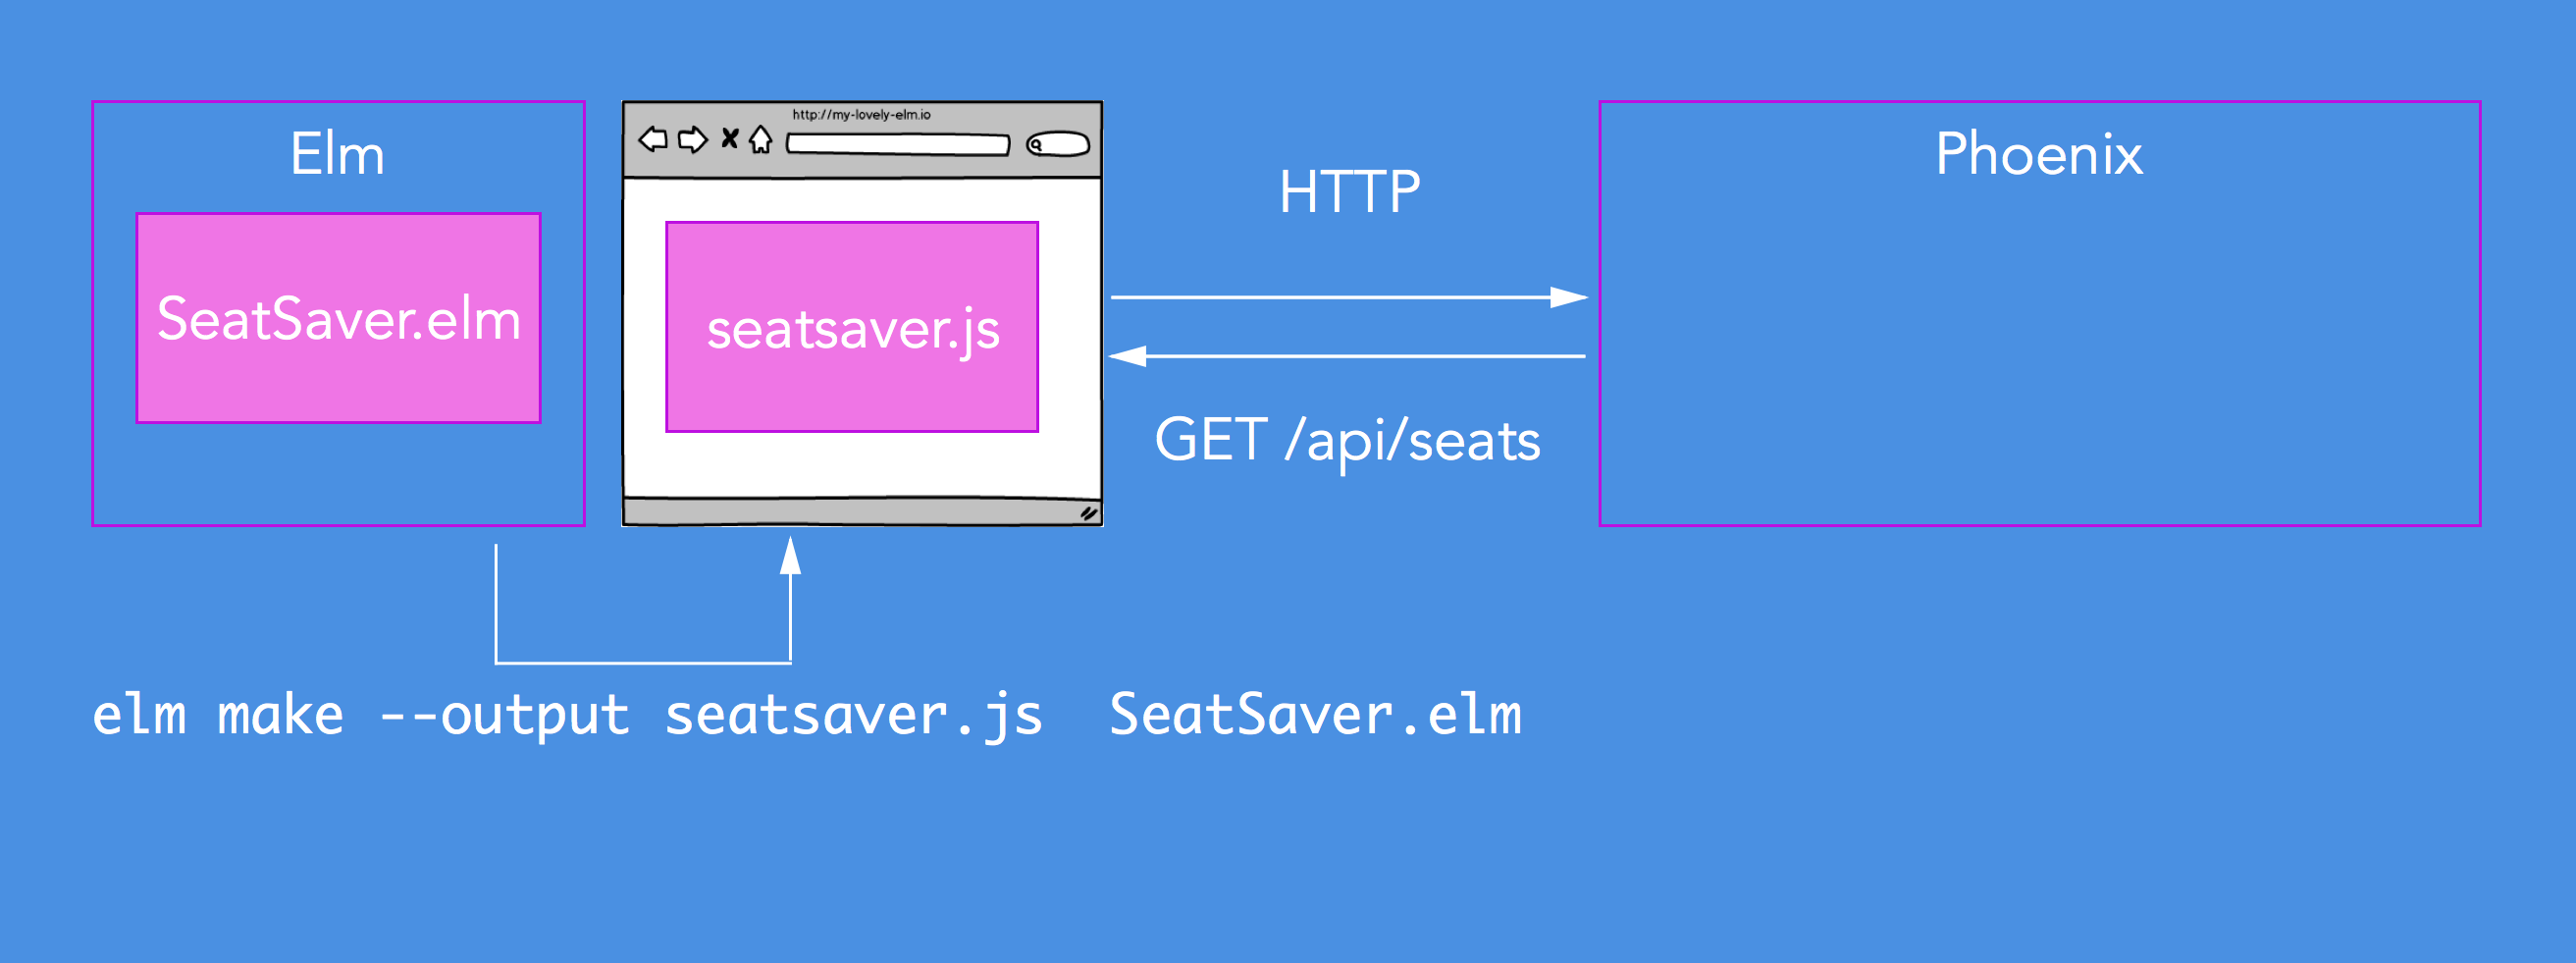
We compile Elm to JavaScript using the
elm makecommand and just run it in a browser. We can then make use of HTTP or similar to talk between the two.Seeing as the Elm application compiles down to JavaScript we can just vendor it into our Phoenix application.
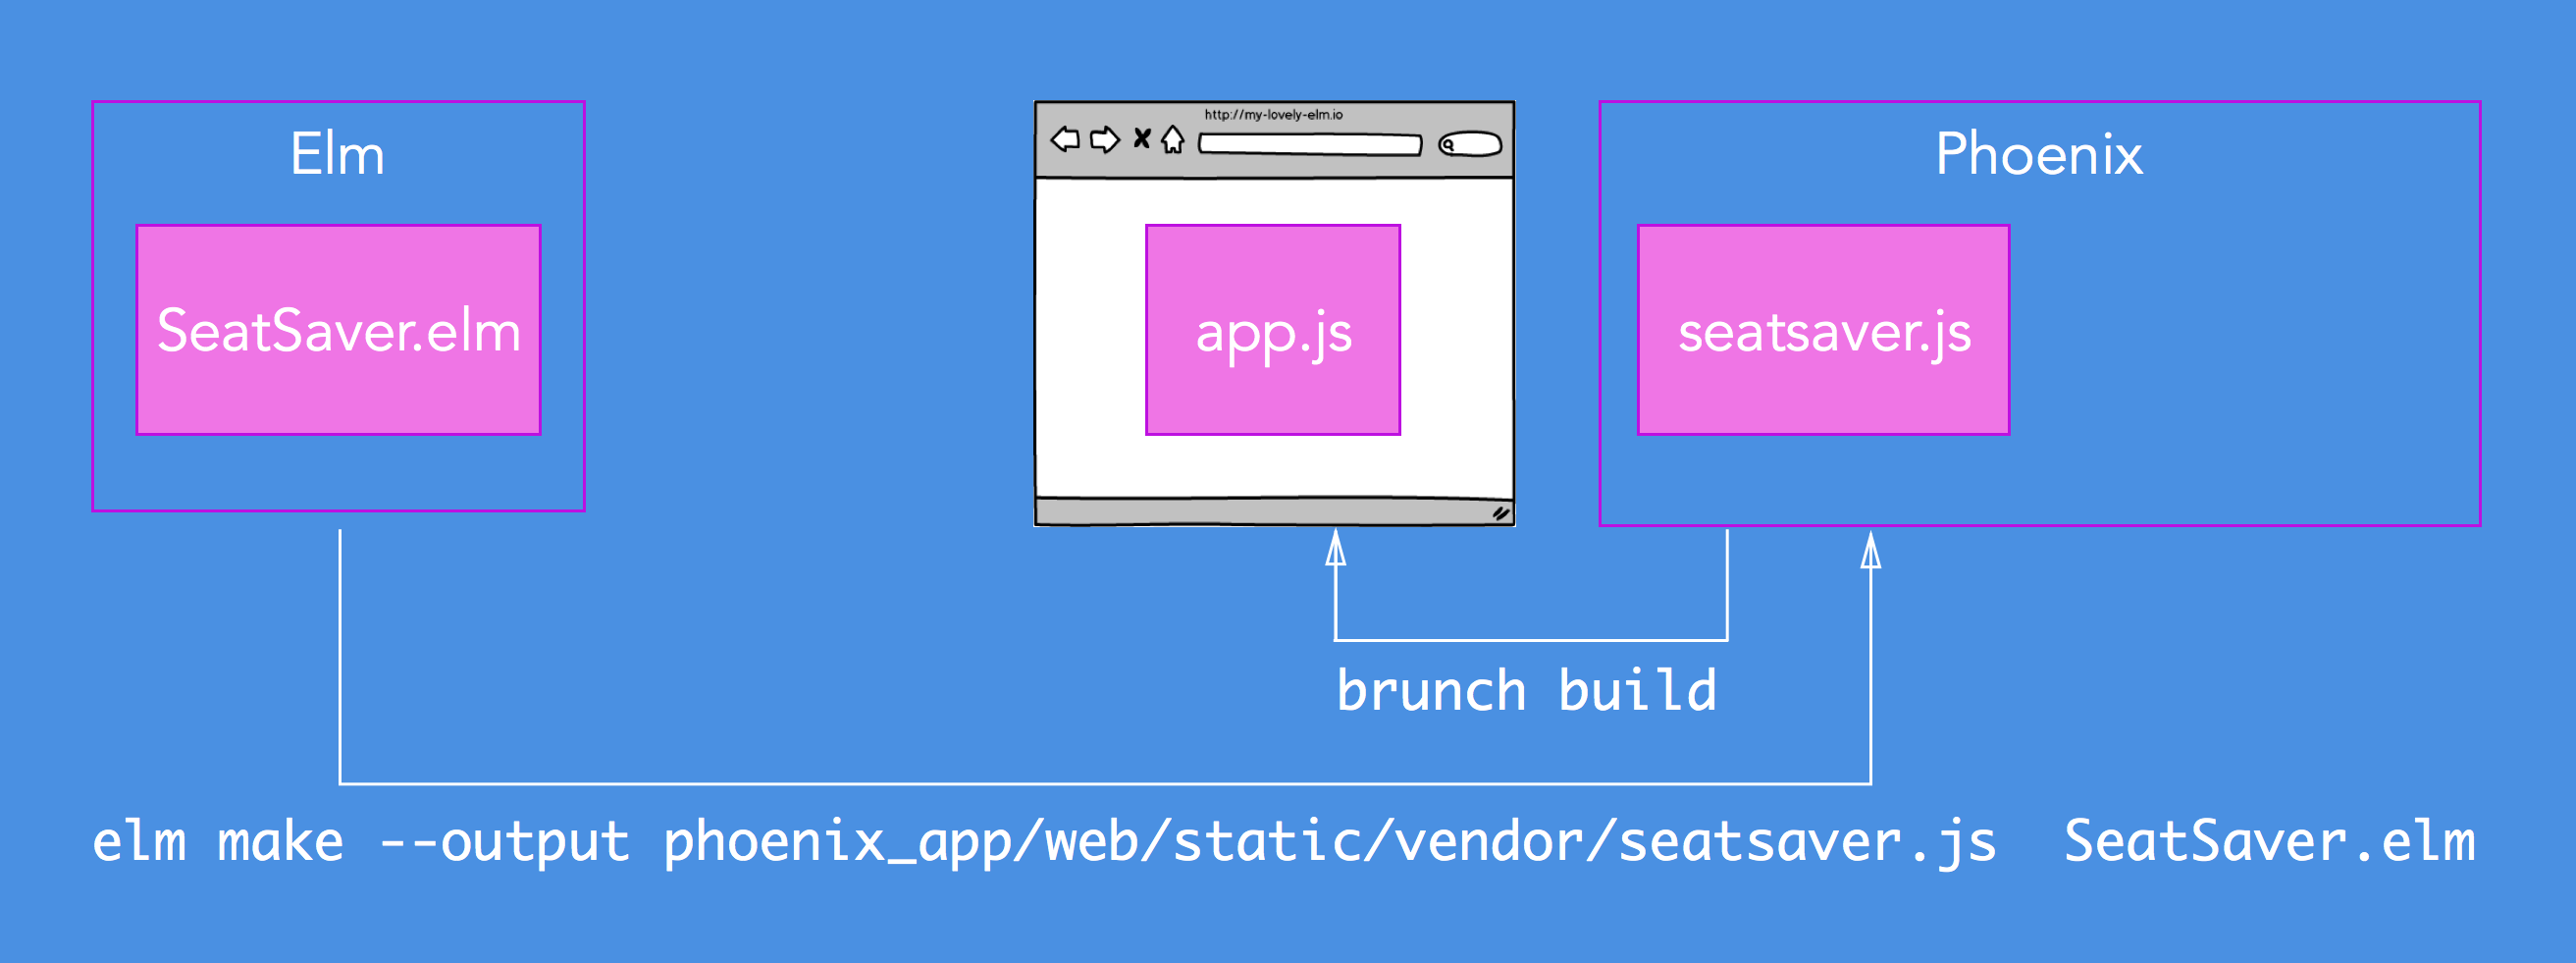
Compiling our Elm application into web/static/vendor will ensure that the Brunch pipeline picks it up when building our Phoenix application's JavaScript. You can put your Elm application's JavaScript anywhere within your Phoenix project as long as you tell Brunch where to find it. Another reason that I am placing it into web/static/vendor is that Elm builds to ES5 JavaScript and Brunch is setup by default not to transpile files in web/static/vendor.
The third way, and the way that we will be using in this tutorial, is to embed Elm in your Phoenix application.
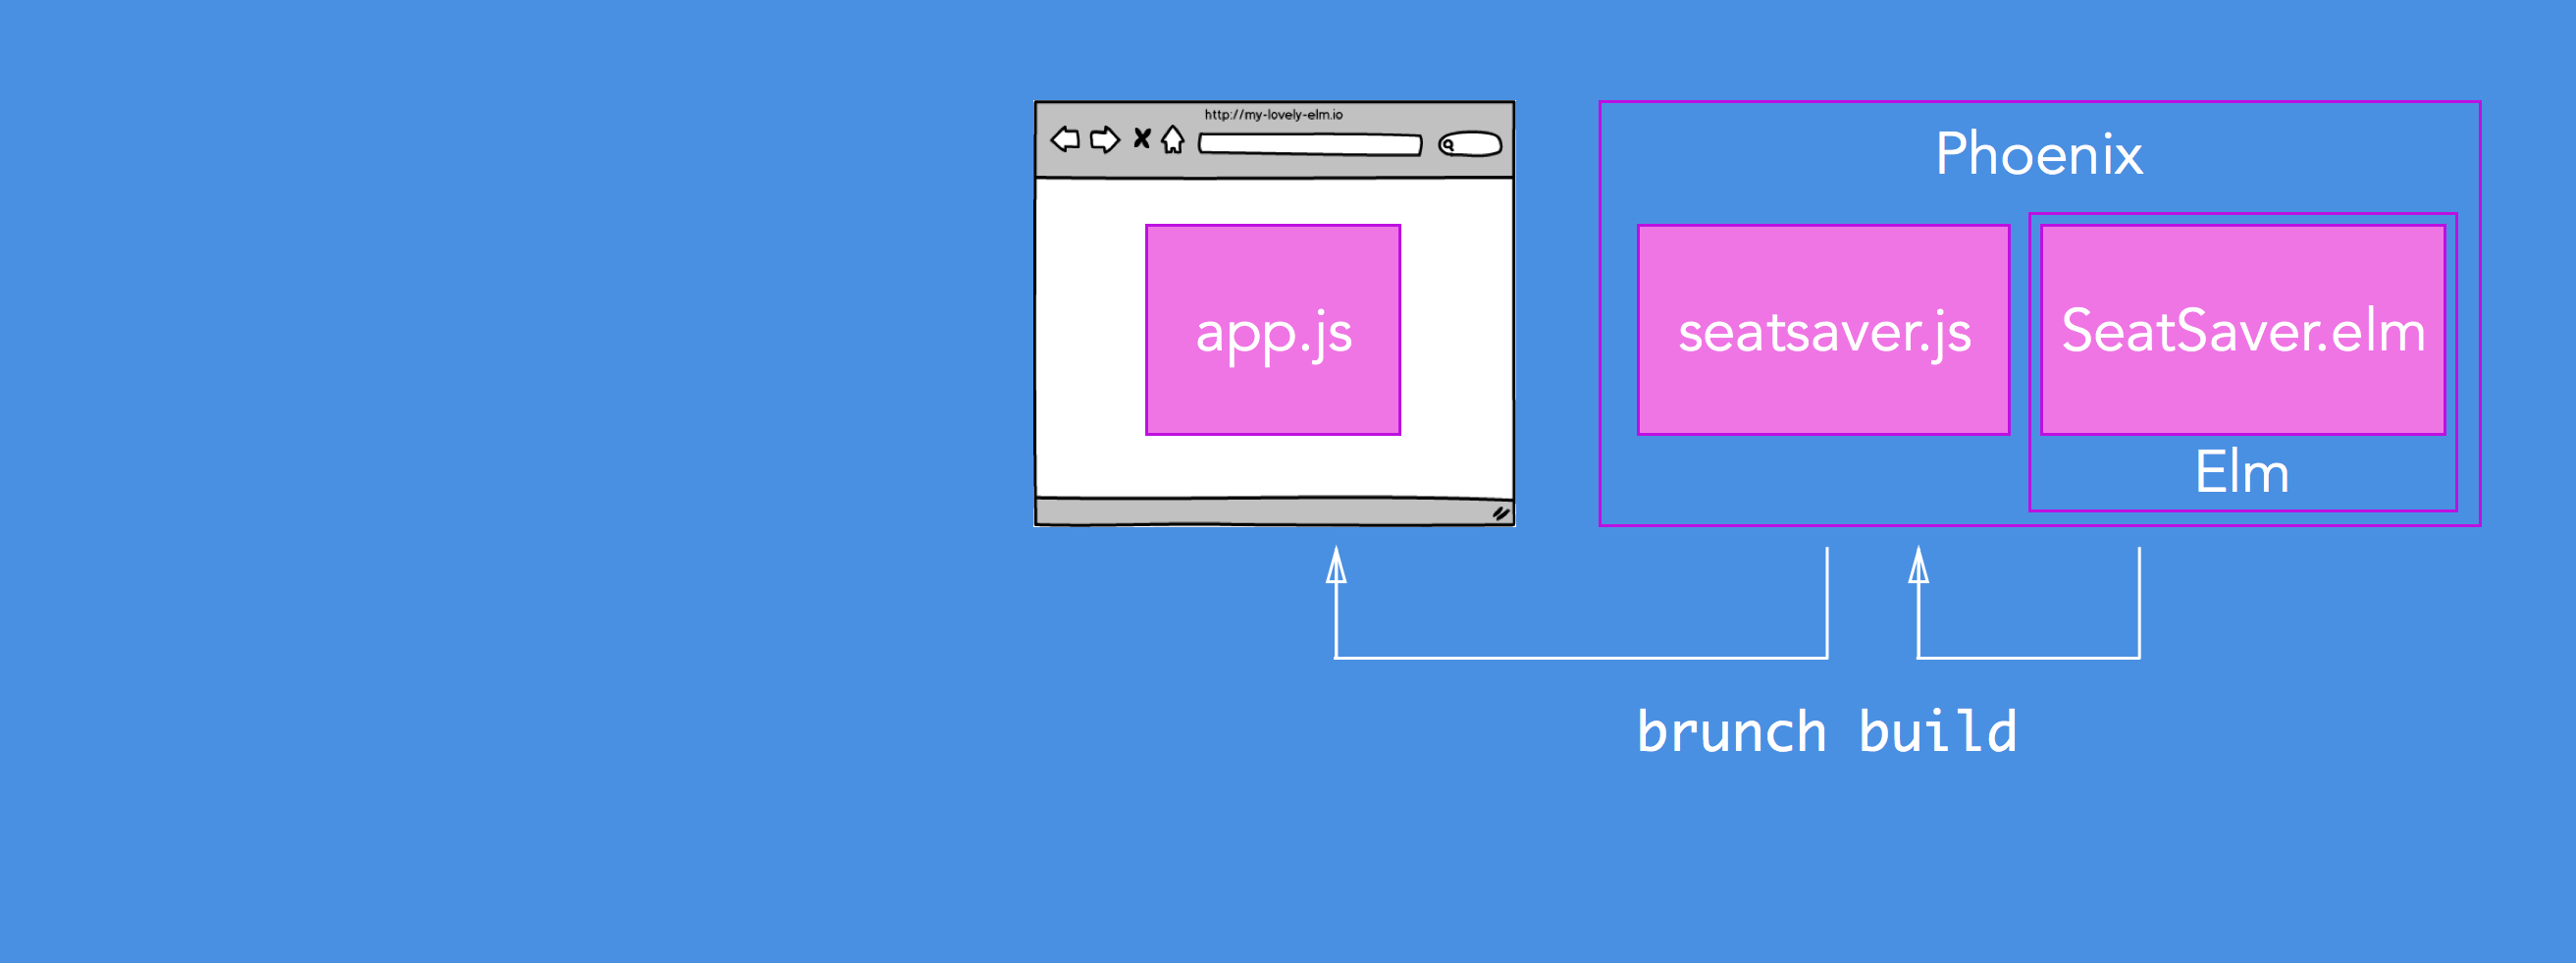
By embedding our Elm application into our Phoenix application we can take advantage of the existing Brunch pipeline to first compile our Elm application into a JavaScript file, and then to have the resulting JavaScript file added to the existing build pipeline so that it is available for our Phoenix application. This has the added bonus of enabling livereload every time you make a change in your Elm application files.
Adding Elm into Phoenix
Let's start by adding an Elm application into our Phoenix application.
Shutdown the Phoenix server (Ctrl+c twice) so that Brunch doesn't build whilst we're setting things up.
If you forget to close the server you may find yourself with an elm-stuff folder and elm-package.json file in the root of your Phoenix project. Just delete these and carry on with the instructions below.In the terminal, at the root of the seat_saver project we just created, do the following:
# create a folder for our Elm project inside the web folder
mkdir web/elm
cd web/elm

# install the core and html Elm packages (leave off the -y if you want to see what's happening)
elm package install -y
elm package install elm-lang/html -y
Create a file called SeatSaver.elm in the web/elm folder and add the following:
module SeatSaver exposing (..)

import Html

main =
  Html.text "Hello from Elm"
This creates a new Elm module called
SeatSaverand then imports theHtmllibrary so that we can use its functions. Every Elm application must have amainfunction that acts as its starting point. In ourmainfunction we call out to thetextfunction in theHtmllibrary, passing it a string. This will result in that string being written out to the screen when the Elm application is run in a browser.
Building with Brunch
Now let's set up Brunch to automatically build the Elm file for us whenever we save changes to it.
Brunch is an HTML5 build tool sort of like Grunt or Gulp. We're going to use it to compile our Elm application into JavaScript and then package it up with the rest of our application's JavaScript. We're using Brunch because it is included by default with Phoenix. If you are not familiar with Brunch you should still be able to follow along with the instructions below. However, if you want to know more, the Brunch Guide is the best place to start.
Return to the root of the project from web/elm, if you haven't already.
cd ../..Add elm-brunch to your project by running
npm i --save-dev elm-brunch.// package.json { ... "dependencies": { "babel-brunch": "~6.0.0", "brunch": "~2.1.3", "elm-brunch": "~0.7.0", "clean-css-brunch": "~1.8.0", ... } }Edit your brunch-config.json file as follows, adding our Elm file into the watched list so that live reload will fire after any changes and making sure that
elmBrunchis the first plugin:// brunch-config.json { ... paths: { watched: [ ... "test/static", "web/elm/SeatSaver.elm" ], ... }, plugins: { elmBrunch: { elmFolder: "web/elm", mainModules: ["SeatSaver.elm"], outputFolder: "../static/vendor" }, ... }, ... }*Windows*: if you're using Windows elm-brunch doesn't yet handle file paths with / instead of \\. You can get around this for just now (if you're only developing on a Windows machine) by changing the plugins config as follows: plugins: { elmBrunch: { elmFolder: 'web\/elm', mainModules: ['SeatSaver.elm'], outputFolder: '..\/static\/vendor' }, ... },Note that you can now use NPM to install Elm and configure elm-brunchto use the local version of Elm. This has several advantages:- You can specify a particular version of Elm to use.
- You can bundle Elm with your project to make it easier for others to get up and running with the correct version.
# from the terminal
npm i --save-dev [email protected]

# in brunch-config.json
{
  ...
  plugins: {
    ...
    elmBrunch: {
      executablePath: './node_modules/elm/binwrappers'
    }
    },
    ...
  }
}
Hooking up to the frontend
Now we need to adjust our Phoenix application to display the HTML output by the Elm application.
Replace web/templates/page/index.html.eex with the following:
<div id="elm-main"></div>By making this change we have broken one of our tests. To keep it passing for now, let's make a small tweak to test/controllers/pagecontrollertest.exs.
test "GET /", %{conn: conn} do
  conn = get conn, "/"
  assert html_response(conn, 200) =~ "<div id=\"elm-main\"></div>"
end
Now we can hook up our Elm application by adding the following to the bottom of our web/static/js/app.js file:
...
const elmDiv = document.getElementById('elm-main')
    , elmApp = Elm.SeatSaver.embed(elmDiv)
This grabs the
divwe just set up by its ID and then callsElm.SeatSaver.embedpassing in the div that we just captured.Elm.is not the only way to work with an Elm application. We could have avoided using an element to embed the application into by calling.embed Elm.SeatSaver.fullscreen()instead.In order to keep things easier to see, let's also change the web/templates/layout/app.html.eex
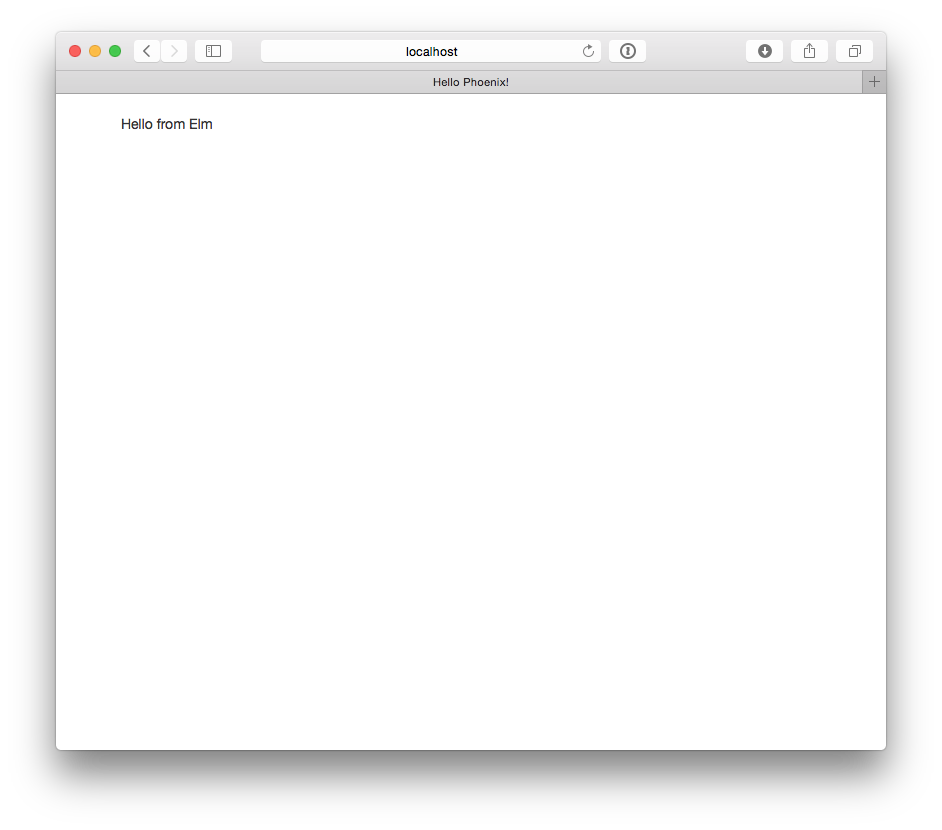
<!DOCTYPE html>
<html lang="en">
  <head>
    <meta charset="utf-8">
    <meta http-equiv="X-UA-Compatible" content="IE=edge">
    <meta name="viewport" content="width=device-width, initial-scale=1">
    <meta name="description" content="">
    <meta name="author" content="">

    <title>Hello SeatSaver!</title>
    <link rel="stylesheet" href="<%= static_path(@conn, "/css/app.css") %>">
  </head>

  <body>
    <div class="container">

      <main role="main">
        <%= render @view_module, @view_template, assigns %>
      </main>

    </div> <!-- /container -->
    <script src="<%= static_path(@conn, "/js/app.js") %>"></script>
  </body>
</html>
Firing up the Phoenix server again should build the Elm file and output the JavaScript to web/static/vendor/seatsaver.js, which will in turn get compiled into priv/static/js/app.js (providing we made no further changes to brunch-config.json).
iex -S mix phoenix.serverIf you point your browser to http://localhost:4000 now you should see something like this:
Summary
We now have a basic Phoenix application setup and the beginnings of an Elm application embedded inside it. In Part 3 we'll start building our Elm application into something a bit more useful.